Forum Replies Created
-

Patrick! Dude, thanks so much for sharing this valuable resource!! You rule.
Can’t wait to give these a listen in the morning in the studio 🤘
Hey, when u get a sec, can you re-upload your photos using the camera icon instead of the document (paperclip) icon?
For some reason, our platform here doesn’t accept photos as “documents”…. doh!
Thanks man!
-
I’d love to talk about MS for guitars and vocals on the Zoom tomorrow! Hope yall can make it 🤞
https://www.addevent.com/event/szn3n4ywg7tt

addevent.com
Bring a question, share a recent win, or just hang out! Whether you’re recording vocals in a closet, building your first mix template, or trying to get your songs to jump out of the speakers — this hour is for … Continue reading
-
O….M….G, @joerobinson – you are incredible! What an unbelievable rendition of this song, with playing and soloing and changes and modulations to make a person’s face MELT! 🫠⚡️
Amazing video production as well, homey, wow.
Love your M/S setup – what a great idea, and it sounds excellent on my laptop. I’ll give it a proper listen in the studio tomorrow.
Which mics are you using, btw? They look snazzy!
Great to “see” ya, man!!
-
Jesse!
Great troubleshooting and thanks for all the info you provided 👌
I don’t know that interface specifically, but I’m 99% certain I understand what’s going on and how to fix it.
Many audio interfaces have their own software-level control like the one you mentioned in your post. This volume control happens in the software before the signal even arrives at the interface.
So… the level at which you set the software will affect the loudness off the DAW to all areas of the interface (speaker volume via monitor outputs, headphone volume via headphone outputs).
Here’s a likely fix:
- Set the interface’s software “DAW output level” to Unity / 0db / 100% / or whatever is its native default “full-output” state
- Use the interface’s physical “monitor out” volume knob to control speaker volume (you’ll prob need to turn it way down now that software control has been reset to Unity)
- Enjoy much louder headphones!
Couple add-on notes:
- see @-PT‘s excellent reply re headphone models and OHMs. Some headphone models do require a lot more output to get them sounding nice and loud.
- … to that end, yes, you hit the nail on the head re external headphone amp. You could definitely designate a separate pair of line outputs to be used for headphones. Feed that stereo pair to either a) a stereo power amp that feeds passive headphone distribution boxes like my beloved Redco Audio “little red cue box”; or b) an all-in-one powered headphone distribution system.
BUT …. I highly doubt you’ll need this in your situation once your interface software is correctly gain-staged.
Keep us posted!!
-
Sounding real good, @pat 🤘
My main thought is to turn up the bass gtr throughout. That cool, wily piano with all it’s charm and disparite harmonies/voicings, could be nicely anchored with a stronger “root” in the mix – i.e. fundamental chord tone.
Along with those beefy badass steady rockin drums, a solid louder bass guitar will help the listener feel anchored while the singer/pianist reach for the stars.
Dig?
Just my 2 cents. Great work!!
Dana
-
Right on, man – yeah, they all sounded great! You can’t lose with any of those great options. Thanks again for sharing this cool comparison! 🙏🏻🤘
-
What an awesome experiment, @pat – and great job with your level matching and consistent performance on each mic!
Man, to me, these all sound very similar to each other. Like … REAL similar!
And I’m happy with the sound of all 3 of those vocal recordings ✅ ✅ ✅
If I had to put them in order, fav to least fav, for your voice on this song:
- Mojave (great “chest-y” richness AND top-end air)
- Neumann (silky top-end .. a close second)
- Avantone (sounds nice – not mad at it! just felt a bit darker than the other two)
What were your thoughts?
-
Wow, Patrick – super cool, man! Feels like 1 complete SIDE A of a 12″ vinyl release … 🤩
I’m still hoping for more bass gtr, and more booty on that kick drum.
In the 5-9min instrumental section: when drummer hits the cymbals I can hear your gate chopping off the cymbal decay. Sometimes in those situations I’ll automate the gate’s threshold setting or release time right after the offending crash cymbal hits.
Ooh, and love the bouncy section around 12min, and all the cool infinite reverb FX. What a fun project to work on, full of creative sonic exploration!!
Badass, man!
-
Hahaha – well, now you know you should let us know when it’s your bday, Paul! We’re all ‘here for it’, as the kids say. 💜🧁
-
Ooh, that’s sounds like a great tool, Joe, thanks!
I find in-ears to be especially deceptive when it comes to loudness and fatigue. I love ’em – don’t get me wrong – but yeah, when I’m in them for a long time, taking them out sometimes leaves me feeling aurally exhausted. 👂😮💨
Thanks for the great tip!
Adding a link here for anyone interested. It’s wild how different the recommended ‘safe listening time’ is btwn NIOSH and OSHA … NIOSH is like “no more than 47 mins at 95db average” and OSHA’s like, “let’er rip for 4 hours – you’ll be FINE!” lol
https://www.sensaphonics.com/products/db-check-pro

sensaphonics.com
DB Check Pro Sound Level Analyzer
The dB Check Pro in-ear sound level analyzer is the key to safe listening when using in-ear monitors & headphones. It measures audio levels with both earpieces inserted and displays the average level & safe exposure time under both NIOSH … Continue reading
-
Ohhh interesting – hmm, it may be that the headphone amp itself isn’t very powerful, as you alluded to in your original post.
One simple, low-budget workaround would be to “supplement” the interface’s built-in HP amp with a powered splitter like this one from Mackie.
DISCLAIMER: Your hi-fi audiophile friends will mock you cause you’d be double-amping your headphone output, but it’ll totally work and nothing will break and you’ll prob get some additional output gain from the powered splitter. (I have @cmn‘s studio rigged this way and it works fine — UAD Twin > built-in HP out (set at Unity Gain) > inexpensive 1×4 powered headphone splitter > Audio Technica headphones.
SIDENOTE: FWIW, I never use “direct monitoring” personally. I always want to perform to the version of the mix with all the FX on it. Here are some ways I manage latency to make that possible:
- During the recording phase, I keep my hardware buffer size as low as my system allows (usually 64-128 samples) and I steer clear of plug-ins with notoriously large latency. This means while tracking I tend to stick to very efficient reverb plugins, etc.
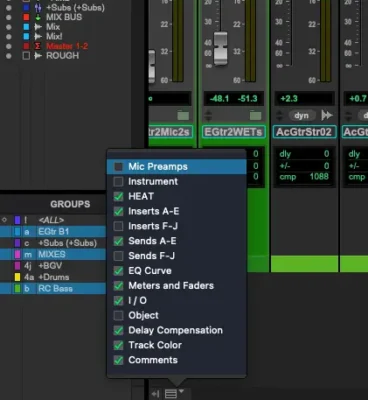
- I’m always keeping a close eye on which plugins are inducing the most latency so I know which to temporarily deactivate if I need to do a quick overdub. In Pro Tools this is done by enabling the “Delay Compensation” view checkbox in the mix window.
- When I feel like all the recording is done and I’m now mixing the record, I might start swapping out reverbs and/or adding some of my favorite heavy-latency plugins as needed.

-
WOAH – @-PT – I didn’t put it together that it’s your birthday!! Happy birthday “dude OHMs”!!! 🎉👯♂️🪩🍣
-
Beni Swa … LOLOL. Love my alter-ego’s French alter-ego! 🇫🇷
Great points, Paul – and yeah, such an awesome emotional ride, @pat!
Social Media