
Forum Replies Created
-

Dana Nielsen
AdministratorNovember 6, 2025 at 12:58 am in reply to: Lining up audio from different recordersWhelp .. my “quick demo” turned into a 90-minute start-to-finish alignment and mixing workshop 😂. I hope you and others here find this helpful and interesting!
This is an unedited, single-take vid, and there are a couple minor audio dropouts but they pass quickly.
Ooh! And … you’ll get an early glimpse at my ongoing studio makeover!
So, grab a bag of popcorn, hit full-screen mode on the video, beam it up to your living room TV and NERD OUT!
BTW, @JLew – this music and the fall foliage setting are absolutely gorge!
-
Dana Nielsen
AdministratorNovember 2, 2025 at 1:30 pm in reply to: Lining up audio from different recordersGreat question, Jesse – and great response, @-PT!
Is the iphone the only camera position, or is this a multi-cam setup?
For me, I’d keep this pretty simple:
- Ensure the clap audio in your close mics lines up with the clap motion in the video. NOTE: mute or disregard the iphone audio at this point! Move the iphone video (with its muted audio) around, frame by frame, until it syncs up nicely with your close-mic audio tracks.
- Now, unlink the iphone audio from the iphone video so you can move the iphone audio independently from its video track.
- Next, move the unlinked iphone audio so that it’s “clap” syncs up with your close mic claps. NOTE: sometimes I’ll change my vid editor timeline to Samples at this point if I’m unable to achieve good sync/phase using the Frames timeline.
- Unmute the stereo iphone audio track and balance against your direct mics to taste!
Bonus Round: Add a millisecond-based delay plugin to your iphone audio set to 100% Wet, and try sweeping around the delay time (say, btwn 0 and 100ms) to simulate control over how far away the iphone microphone is. By adding 15 milliseconds, the iphone mic will sound as if it’s roughly 15 feet away from your direct mics! (Yay, the science part!). NOTE: honestly, for mixing purposes, at this point I would just ditch the science and use my ears while sweeping around the ms delay time on the plugin until I settle on something that sounds cool… who knows– it might sound amazing set to 1137ms!)
Can’t wait to hear what you end up with!
🤓
PS – here’s some speed of sound info from the ol’ Google machine:
It would take approximately 13.3 milliseconds for sound to travel 15 feet in dry air at room temperature.
The calculation is based on the following:- Speed of sound: Approximately 1,125 feet per second (fps) at 20 °C (68 °F).
- Formula: Time = Distance / Speed
- Calculation in seconds: 15 feet / 1,125 fps = 0.01333 seconds.
- Convert to milliseconds (1 second = 1,000 milliseconds): 0.01333 seconds * 1,000 ms/second ≈ 13.3 ms.
A common approximation used in live sound engineering is that sound travels about one foot per millisecond (1 ms/ft). Using this simple rule of thumb, the time would be approximately 15 milliseconds. The more precise calculation above gives a more accurate value.
-
Hey @barrose! Love this question, and thanks for the thoughtful context!
You’re comparing a few solid options: your current UAD 6176 (which I also own and recommend often), your Apollo Solo, and the Neve 88M you’re considering. I know the 6176 is on loan or going away, so the core of your question is: Is the 88M a step forward or a step back?
Here’s my honest take…
TL;DR: Preamp ≠ Magic … EQ + Output Control = Magic
The Neve 88M is no doubt a high-quality piece of gear. But so is your Apollo Solo, and honestly, when it comes to just mic preamps, the differences between most units – even boutique ones – are often overstated, especially in a clean, low-gain scenario like vocals or acoustic guitar. Both the Solo and 88M offer clean, low-noise gain with solid conversion.
But what I personally really care about in a preamp isn’t the name on the front, it’s:
-
A bit of EQ (even just a top-end shelf or low cut)
-
An output fader (so I can push the input gain and back off the output for harmonic saturation)
That’s why I love the 6176. With input and output controls, you can drive the tube preamp for tone and still maintain proper recording levels … something neither the 88M nor Apollo Solo really let you do.
If your 6176 is going away and you want to replace both your interface and preamp in one move, then sure, the 88M can work, but it’s not likely to sound radically better than your Apollo Solo. Without EQ or output trim, it’s just… gain.
And when you’re not pushing gain into breakup or leaning into transformer coloration, most preamps (yes, even Neve) are going to sound more alike than different.
My Real-World Suggestion:
If it were me, I’d either:
-
Keep using your Apollo Solo and take full advantage of the UAD Console to add EQ/compression on the way in (just like you’d print with a 6176), OR
-
Invest in a more full-featured channel strip, something with EQ and output control that lets you shape your sound before hitting the DAW
$1,200 is a lot to spend on another “clean” preamp when you already have one in the Apollo. That money might go further toward a versatile mic, plugin suite, or even a 6176 of your own!
🎛️🎚️
Ultimately, the Neve 88M is well-built, but I wouldn’t expect it to be some massive sonic upgrade over what you already have unless you’re specifically craving that Neve badge or want to simplify your rig with an all-in-one interface.
Hope that helps! And would love to hear what others think, especially if anyone’s using the 88M and has A/B’d it with UA gear!
⚡️ Dana
-
-
That’s a great idea! I’ll see if I can put together a lil 1176 walkthrough sometime soon. I’m sure lots of people would dig that.
Meantime, I mention the 1176 basics (including the setting I use practically 99.9% of the time) around the 17min mark in the “Compression by Ear” livestream. Lots of other good compression tips in there too that can be applied to the 1176.
NOTE: login required for this one 👇
mixprotege.com
Login Required LOG IN or REGISTER to access this exclusive content You’re ONE Step Away → You’re ONE Step Away ↓
-
Hey @bigchrizzle! Such a great question, man. Fabfilter Pro-MB is my favorite and I use it constantly.
To me, what sets Pro-MB apart from the Waves options is the frequency bands are not fixed — each band is completely sweepable throughout the entire frequency range. Also, you aren’t limited to 4 or 6 bands, as is the case with the Waves C4 and C6 respectively.
Basically, with the Pro-MB, I feel like when I open it up it’s a blank canvas and I can add bands wherever I like, whenever I like, and can sweep them around anywhere I want, alter any of the bandwidths/crossovers, independently solo/mute each band, add sidechain input, and it even has a blend/mix knob.
The Waves and McDSP offerings are excellent, competent, efficient, wonderful tools! Tho in my opinion and experience they’re better suited for broader tonal and dynamic shaping, whereas the Pro-MB can ALSO be extremely surgical. Here’s another analogy: Waves and McDSP multi-bands are like a Pultec EQP-1A; whereas Fabfilter Pro-MB is like a GML 8200 parametric EQ. All are amazing tools with unique superpowers!
Hope these rambling thoughts are helpful! haha
Which is your favorite multiband compressor among the options you already own?
-
That’s sounding really nice, @pat! Great work!
Will this be for a solo piano recording, or a framework for additional overdubs like bass, vocals, drums, etc.? If it’s solo piano, I might try adding a bit more of the Right channel — via fader or mono gain plugin — so the image of the whole piano feels more centered. I often tweak the L/R balance on a piano during recording or mixing to even things out, depending on which “range” of the instrument being played, especially for solo piano or piano-dominant records, so that the listener doesn’t feel lopsided.
Only other thing I notice is it’s a bit quiet as a master – easy fix with some more fader gain and/or lookahead limiter on your master fader, like the Fabfilter Pro-L2 or Waves L2 or other similar tools.
Keep up the good work, man!
-
Dana Nielsen
AdministratorNovember 5, 2025 at 2:04 pm in reply to: Lining up audio from different recordersI totally understand what you’re dealing with, homey! If you wanna email me a link to the files, maybe I can reply here with a quick video demo – which might be easier and more useful than describing these complex ideas and techniques with typed words, haaha.
-
Dana Nielsen
AdministratorNovember 2, 2025 at 2:02 pm in reply to: Lining up audio from different recordersThis is sounding beautiful!!
-
That’s great news, Bar! I’m glad you’re able to hang onto that 6176 a bit longer and get some more use outta it!
Great question re saturation and when to use it.
For me, it’s really song/production-dependent. Acoustic guitar is a good example. If I’m recording a delicate singer-songwriter style track I’m usually looking for a full-range, high-fidelity acoustic guitar sound with no need for saturation. I may still compress it on the way into pro tools to get a good level without digital overs, but I prob wouldn’t drive the mic pre toward saturation in that instance.
However, I LOVE adding mic pre input gain saturation to acoustic guitars in a rock production! Like, if the strummy rhythm acoustics enter in the chorus… I need them to be loud and proud so they cut through the mix and fit nicely against hard-hitting drums and electric guitars. Even if it’s a folk-rock americana style, I might push the preamp input a bit hotter – not looking to “hear distortion” in the signal, but more to control peaks a bit and give the sound a subtle edge. In this case the amplifier component (the 610 input tube amp on your 6176) will kinda shave off the loudest peaks. This can work to your advantage, kinda like a compressor before your compressor – and it sounds cool in the right context!
Very cheap or poorly made preamps and other analog components sound terrible when overloaded like this on input. In my opinion, this is a huge part of what makes Neves, APIs, your UA 6176, and other great equipment so sought after — how they handle the extremes (intended AND unintended extremes, haha)! Great gear sounds AWESOME when pushed to the extreme, opening up new creative options. Not-great gear sounds harsh, unforgiving, and unusable.
-
Hey Bar! (and @sexton)! Wow, I love this – such beautiful playing and recording! And to @-PT‘s point, I agree — @JLew will totally dig this awesome instrumental 😊.
“Outlaw” lolol – perfect word for that wonderful feeling of “breaking the rules” with your equipment. Haha, love it! Whatever you’re doing to “abuse” that 6176 sounds GREAT – keep it up!
I’m not familiar with those other specific pieces of gear you mentioned but in general, heck yeah, these days it’s easier and easier to get expensive-sounding results using budget-friendly gear. You could probably even return/exchange for something different if you’re not satisfied with your first choice (assuming you’re buying something new from Guitar Center, Sweetwater, Amazon, etc.).
No matter the brand/model you settle on, per the video above in this thread, I would just try to find a piece (or pieces) of gear that ‘check the same boxes’ as that 6176 if you can:
- Input gain AND output fader/knob (to control digital peaks when you’re in “Outlaw Mode” 🤠)
- EQ for tone shaping on the way into your DAW
- Compressor/limiter option for shaping dynamics on the way in, and controlling peaks/overs in your DAW
Let us know what you decide on, Bar!
I’m gonna listen to that instrumental again now, cause it’s so nice! 🙌
-
Haha – thanks, Sharon! (and sorry for the delayed response!)
-
Yay! Glad u got some good tips from it, @barrose!
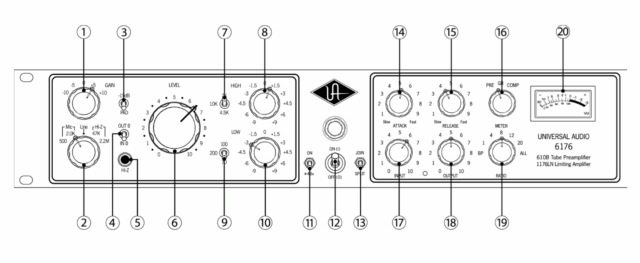
A) You can actually drive the preamp input (1) and turn down the output (6) of the preamp independent of the compressor. You can, for example, bypass the compressor and use the Preamp Out (XLR on back of the unit) straight to the line input of your Apollo.
B) yep!- you can also link the Preamp Out to the Compressor In using the front-panel Join switch (13). 1-3db of reduction at 4:1 would be a safe conservative setting for natural sound. But don’t miss the more exciting/hype-y sounds you can get with that 1176-style compressor! The setting I use for almost everything on any 1176 is Slowest Attack, Fastest Release, 4:1. Push the compressor input until it sounds too compressed, then dial back the input to taste, always adjusting the compressor output as needed to avoid digital overs in your DAW.
Oh, and here’s a link to the manual – Page 3 has a great description and overview!
https://media.uaudio.com/support/downloads/6176_Manual.pdf

-
Dana Nielsen
AdministratorJune 21, 2025 at 5:42 pm in reply to: FREE UA POLYMAX Synth – Flash Sale!Haha same!
-
Dana Nielsen
AdministratorJune 21, 2025 at 1:25 pm in reply to: FREE UA POLYMAX Synth – Flash Sale! -
LOL – heck no, man! Ask away! That’s what these forums are for. Questions like yours help me identify topics that folks wanna learn more about – that way I can make the most useful, helpful vids, forum replies, blogs, etc. Chances are if you’re asking a question, someone else has the same question in mind!
Selfishly, one of my favorite reasons for building out this space here at Mix Protégé is when people ask me technical questions in MP or out in the world — people hoping to learn about a certain aspect of recording, mixing, or a piece of gear — I can be like, “oh, here’s a link where we’re talking about that! Hop on in!”
Social Media